Buck Fixed
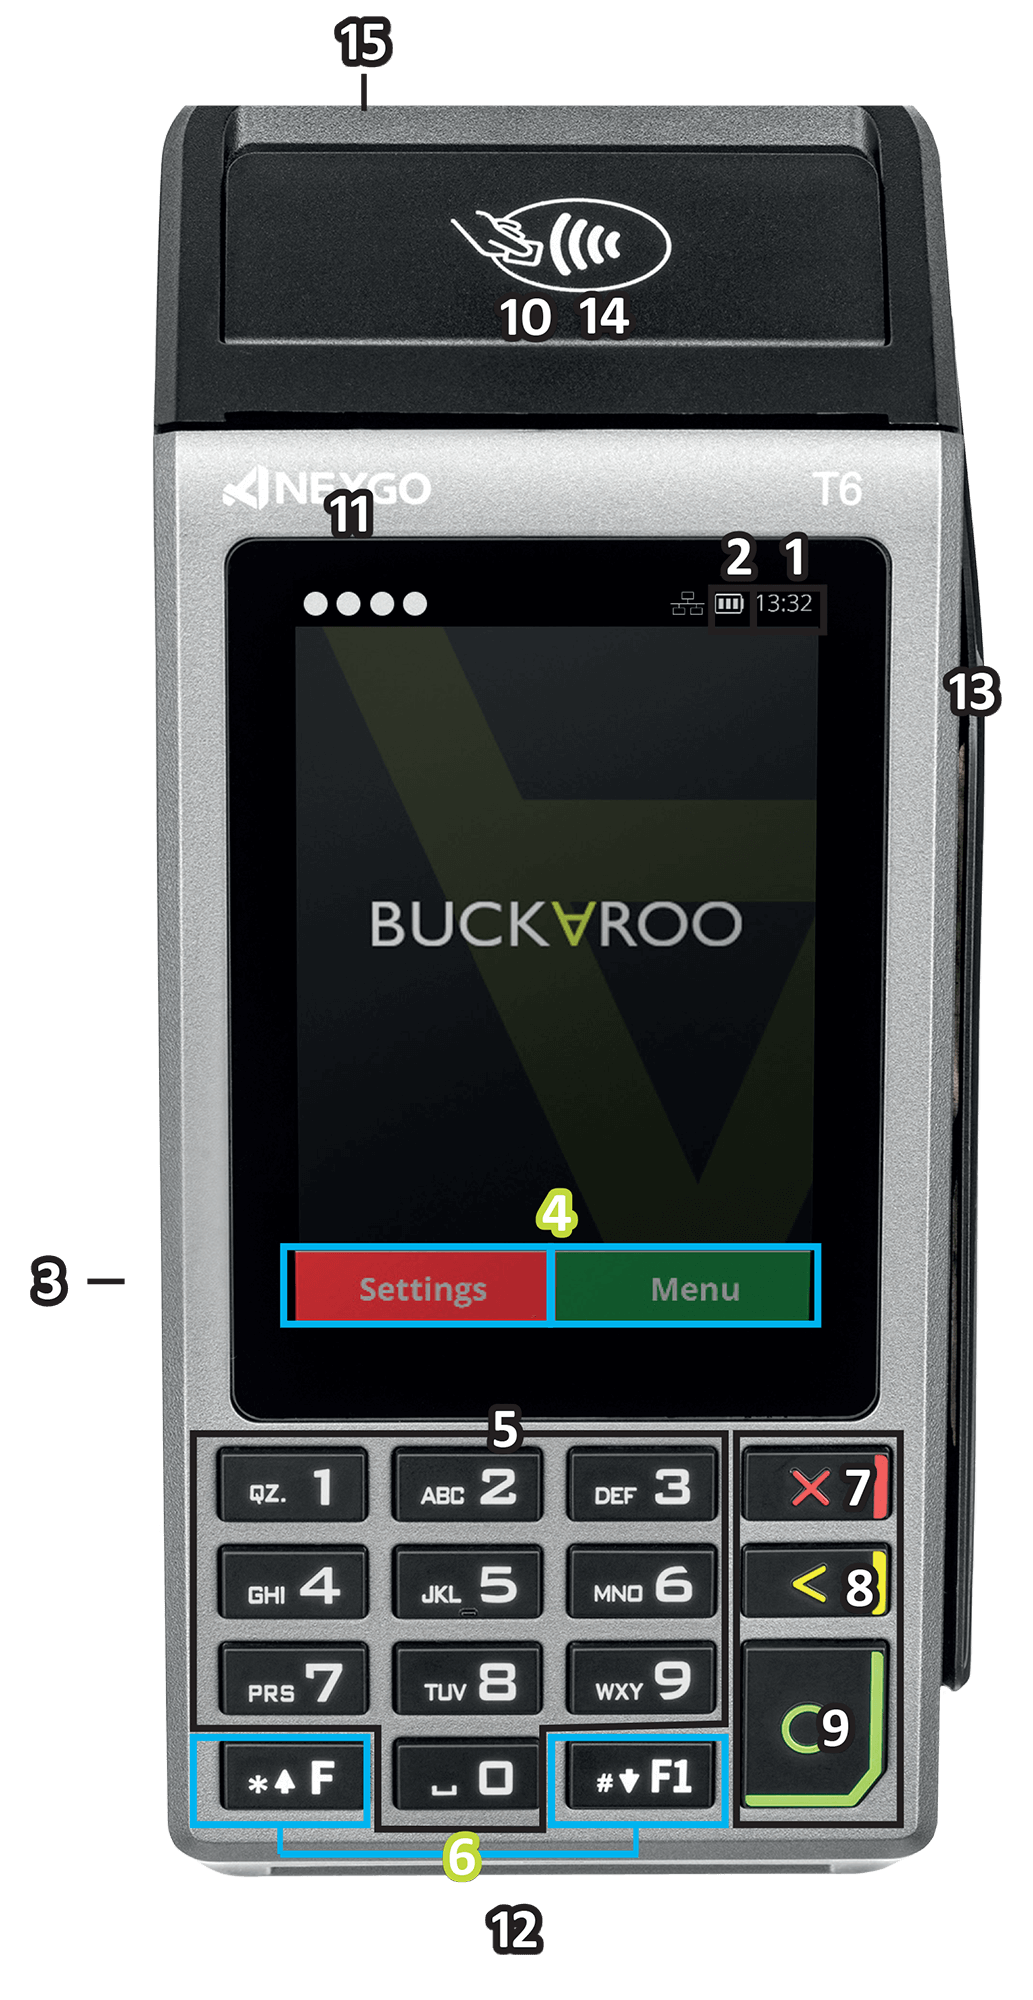
Buck Fixed Overview
- Time
- Power supply indicator
- On/Off key
- Function keys
- Numeric keypad
- Function/scroll keys
- EXIT / BACK
- To exit input (payment, PIN entry, etc.) or to return to the menu.
- CLEAR / DELETE
- To exit input (payment, PIN entry, etc.) or to return to the menu.
- OK / CONFIRM
- To confirm your selection.
- Printer cover
- Indicator lights for contactless payment
- Chip reader
- Magnetic strip reader
- NFC/contactless chip (not visible)
- Mains power supply
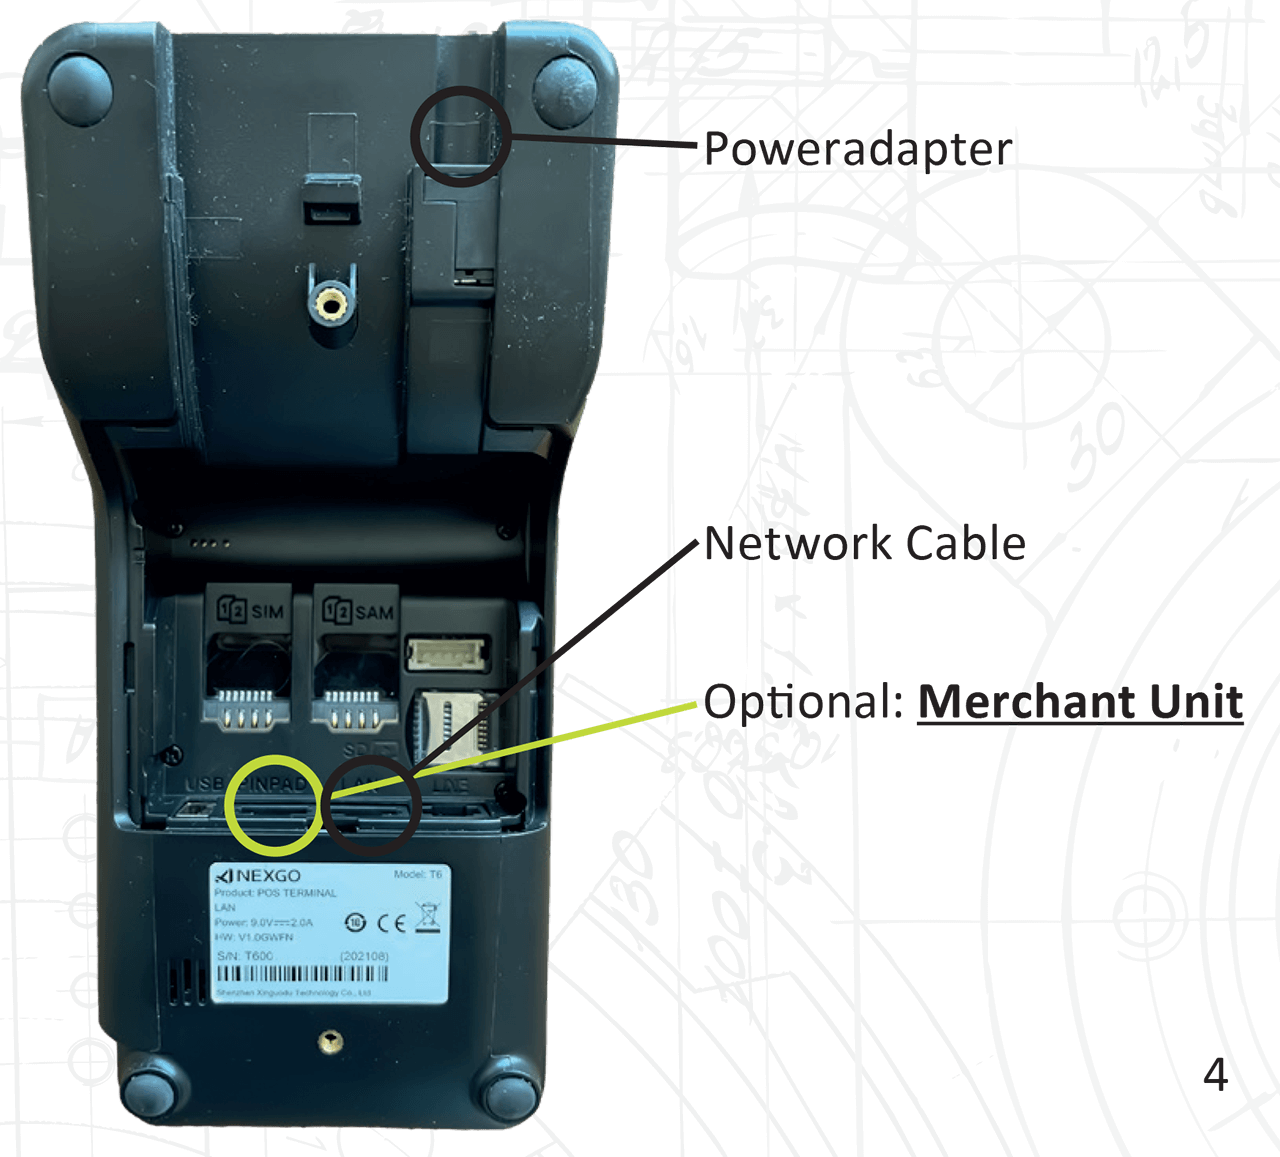
Setup
The Buck Fixed requires a fixed network cable (RJ45). This is not supplied by default, but can be ordered from the SEPAY online store.
- Turn the payment terminal face down. Remove the two screws using the screwdriver supplied.
- Insert the network cable (RJ45) into the LAN port on the rear of the Buck Fixed. Connect the network cable to your network router or switch.
- Optional: connect the SEPAY Cashier unit to the PINPAD port (Buck Fixed DUO).
- Insert the power adapter into the power inlet and plug into the nearest power outlet. We recommend not using an extension cord between the payment terminal and the outlet for it to work correctly.
Connections
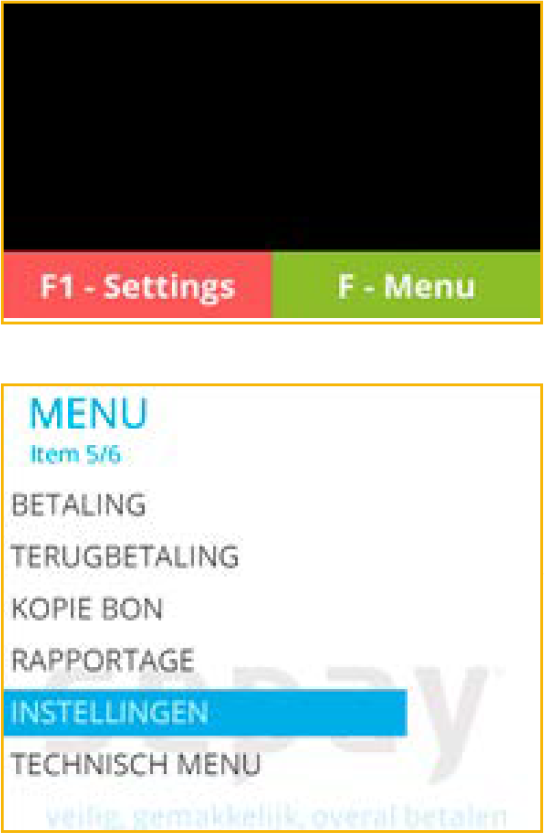
Menu and Settings
Access the menu by pressing the F KEY on the main screen. This can be either the actual key or the key on the display. The menus list options such as Payment, Refund, Copy Receipt, Reporting, Settings, and Technical Menu.
You can select menu items by touching them on the screen or using the function/scroll keys and making a selection by pressing ENTER. Pressing the RED BUTTON (physically or on the display) will exit the menu and return to the main screen.
NoteThe Buckaroo Mobile only enters sleep mode from the main screen (screen with Buckaroo logo).
Language Settings
- On the main screen, press F - MENU.
- Select SETTINGS.
- You can change the language in the SETTINGS menu.
- Select LANGUAGE SELECTION.
- Select the desired language. On confirmation, the terminal returns to the main screen.
Network Settings
The network settings are set to DHCP by default. This means the payment terminal obtains an IP address for the network from the router or switch. This does not usually require any input from yourself.
However, you may be on a secure or managed network and DHCP is disabled. In which case, you can configure the (static) network settings manually.
- Press the F1 KEY on the main screen or the function key at the bottom right of the keypad. This menu is always in English.
- From this menu, select COMMUNICATION, then ETHERNET. You can edit the details from within this menu.
- To use manual IP configuration, select DHCP in this menu, choose DISABLE then ENTER.
To enter the IP details, please complete all fields:
- LOCAL IP
- SUBNET MASK
- GATEWAY
- MAIN DNS
- BACKUP DNS
Technical Menu, Software Configuration
Updates are installed automatically when the payment terminal is switched on and has a mobile network connection. If you are unsure whether your payment terminal has the latest version, you can find out from within My Buckaroo. If you wish to update manually:
- On the main screen, select the F KEY (MENU).
- Select TECHNICAL MENU.
- In the TECHNICAL MENU, you can start an UPDATE by selecting UPDATE.
Key Sounds, Sleep Mode, and Auto Updates
- Press the F1 KEY on the main screen or the function key at the bottom right of the keypad. This menu is always in English.
- From within this menu, select TERMINAL, then DEVICE. This menu shows a number of options which you can customize to your liking:
- BEEP ON KEY — This provides a notification beep when any key/selection is pressed. This option is disabled by default.
- BEEP ON PIN — This option provides a notification beep when the PIN is entered.
- BEEP VOLUME — This option allows you to adjust the volume of the notification sounds. Choose a volume between 0 (softest) and 7 (loudest).
- SLEEP MODE — The time (in seconds) before the payment terminal goes into sleep mode (dark screen). This is set to 60 seconds by default; select 0 to disable sleep mode.
- AUTO UPDATE HOUR | MINUTE — Updates are performed automatically when the payment terminal is switched on. This setting allows you to adjust the time yourself. It is set to 5:00 by default.
Taking Payments
There are two ways to take a payment:
- Press/select (F-MENU) KEY then (PAYMENT) to take a payment.
- By pressing any key on the numeric keypad (0-9).
Next, enter the amount using the numeric keypad (0-9).
Note: If you make a mistake, you can delete everything by pressing the YELLOW (CLEAR) KEY. Confirm the amount is correct by pressing the GREEN (CONFIRM) KEY.
The payment terminal displays the total amount on the screen and asks for a payment card. Depending on the type of payment card, this can be read using the chip card reader on the side (13), or processed contactless by holding the card (or smartphone) over the printer cover (15).
For chip and contactless payments over €50.00, the next screen asks for the PIN code. The customer should key this in and confirm with the GREEN (ENTER) BUTTON.
The payment terminal then processes the payment – wait until completed.
Once payment is approved, a receipt is printed. If the card has been read via the chip, the customer should remove their card. The payment terminal now returns to the main screen.
Please NoteThe payment process can be stopped at any point by pressing the RED key.
Copy Receipt
- On the main screen, select the F KEY (MENU).
- Press the 3 (COPY RECEIPT) key to print a receipt of the most recent transaction approved. The status of the last transaction performed is displayed on the screen.
TipNot sure if a transaction went through? Use the copy receipt function. This displays and/or prints the most recent transaction approved.
Reports
- On the main screen, select the F KEY (MENU).
- Select or press REPORT to print a report or daily statement.
X-TOTALS
- Select or press X-TOTALS to print a report. Choose between COMPACT or EXPANDED.
- This report is basically the same as the Z-TOTALS report, except that the words STILL OPEN are printed at the bottom of the receipt. The session therefore shows as not closed and the figures and amounts are carried forward.
Z-TOTALS
- Select or press Z-TOTALS to print a daily statement. Choose between COMPACT or EXPANDED.
- The payment terminal prints a report showing the total amount debited since the last Z printout. At the bottom of the receipt the words TOTALS RESET appear, along with the time the session ended.
- Reset indicates that the TOTALS have been reset to 0. The new session only starts after the next successful transaction.
Refund
This payment terminal is suitable for refund PINs. This feature needs to be activated within My Buckaroo. For more information, please visit our website.
- On the main screen, select the F KEY (MENU).
- Select REFUND PAYMENT to refund a payment.
- The payment terminal asks for a PASSWORD. Enter your 5-digit code here and confirm with the GREEN (ENTER) BUTTON.
- Enter the refund amount on the numeric keypad (0-9) and confirm with the GREEN OK (ENTER) BUTTON.
- The payment terminal displays the total amount on the screen and asks for a payment card. Depending on the type of payment card, this can be read using the chip card reader on the side (13), or processed contactless by holding the card (or smartphone) over the printer cover (15).
- The payment terminal then processes the refund – wait until completed.
- Once payment is approved, a receipt is printed. If the card has been read via the chip, the customer should remove their card. The payment terminal now returns to the main screen.
Optional: Merchant Unit
The Buck Fixed can be expanded with a cashier unit (Merchant Unit). This makes it easy for you to enter the amounts due. This avoids passing the payment terminal back and forth.
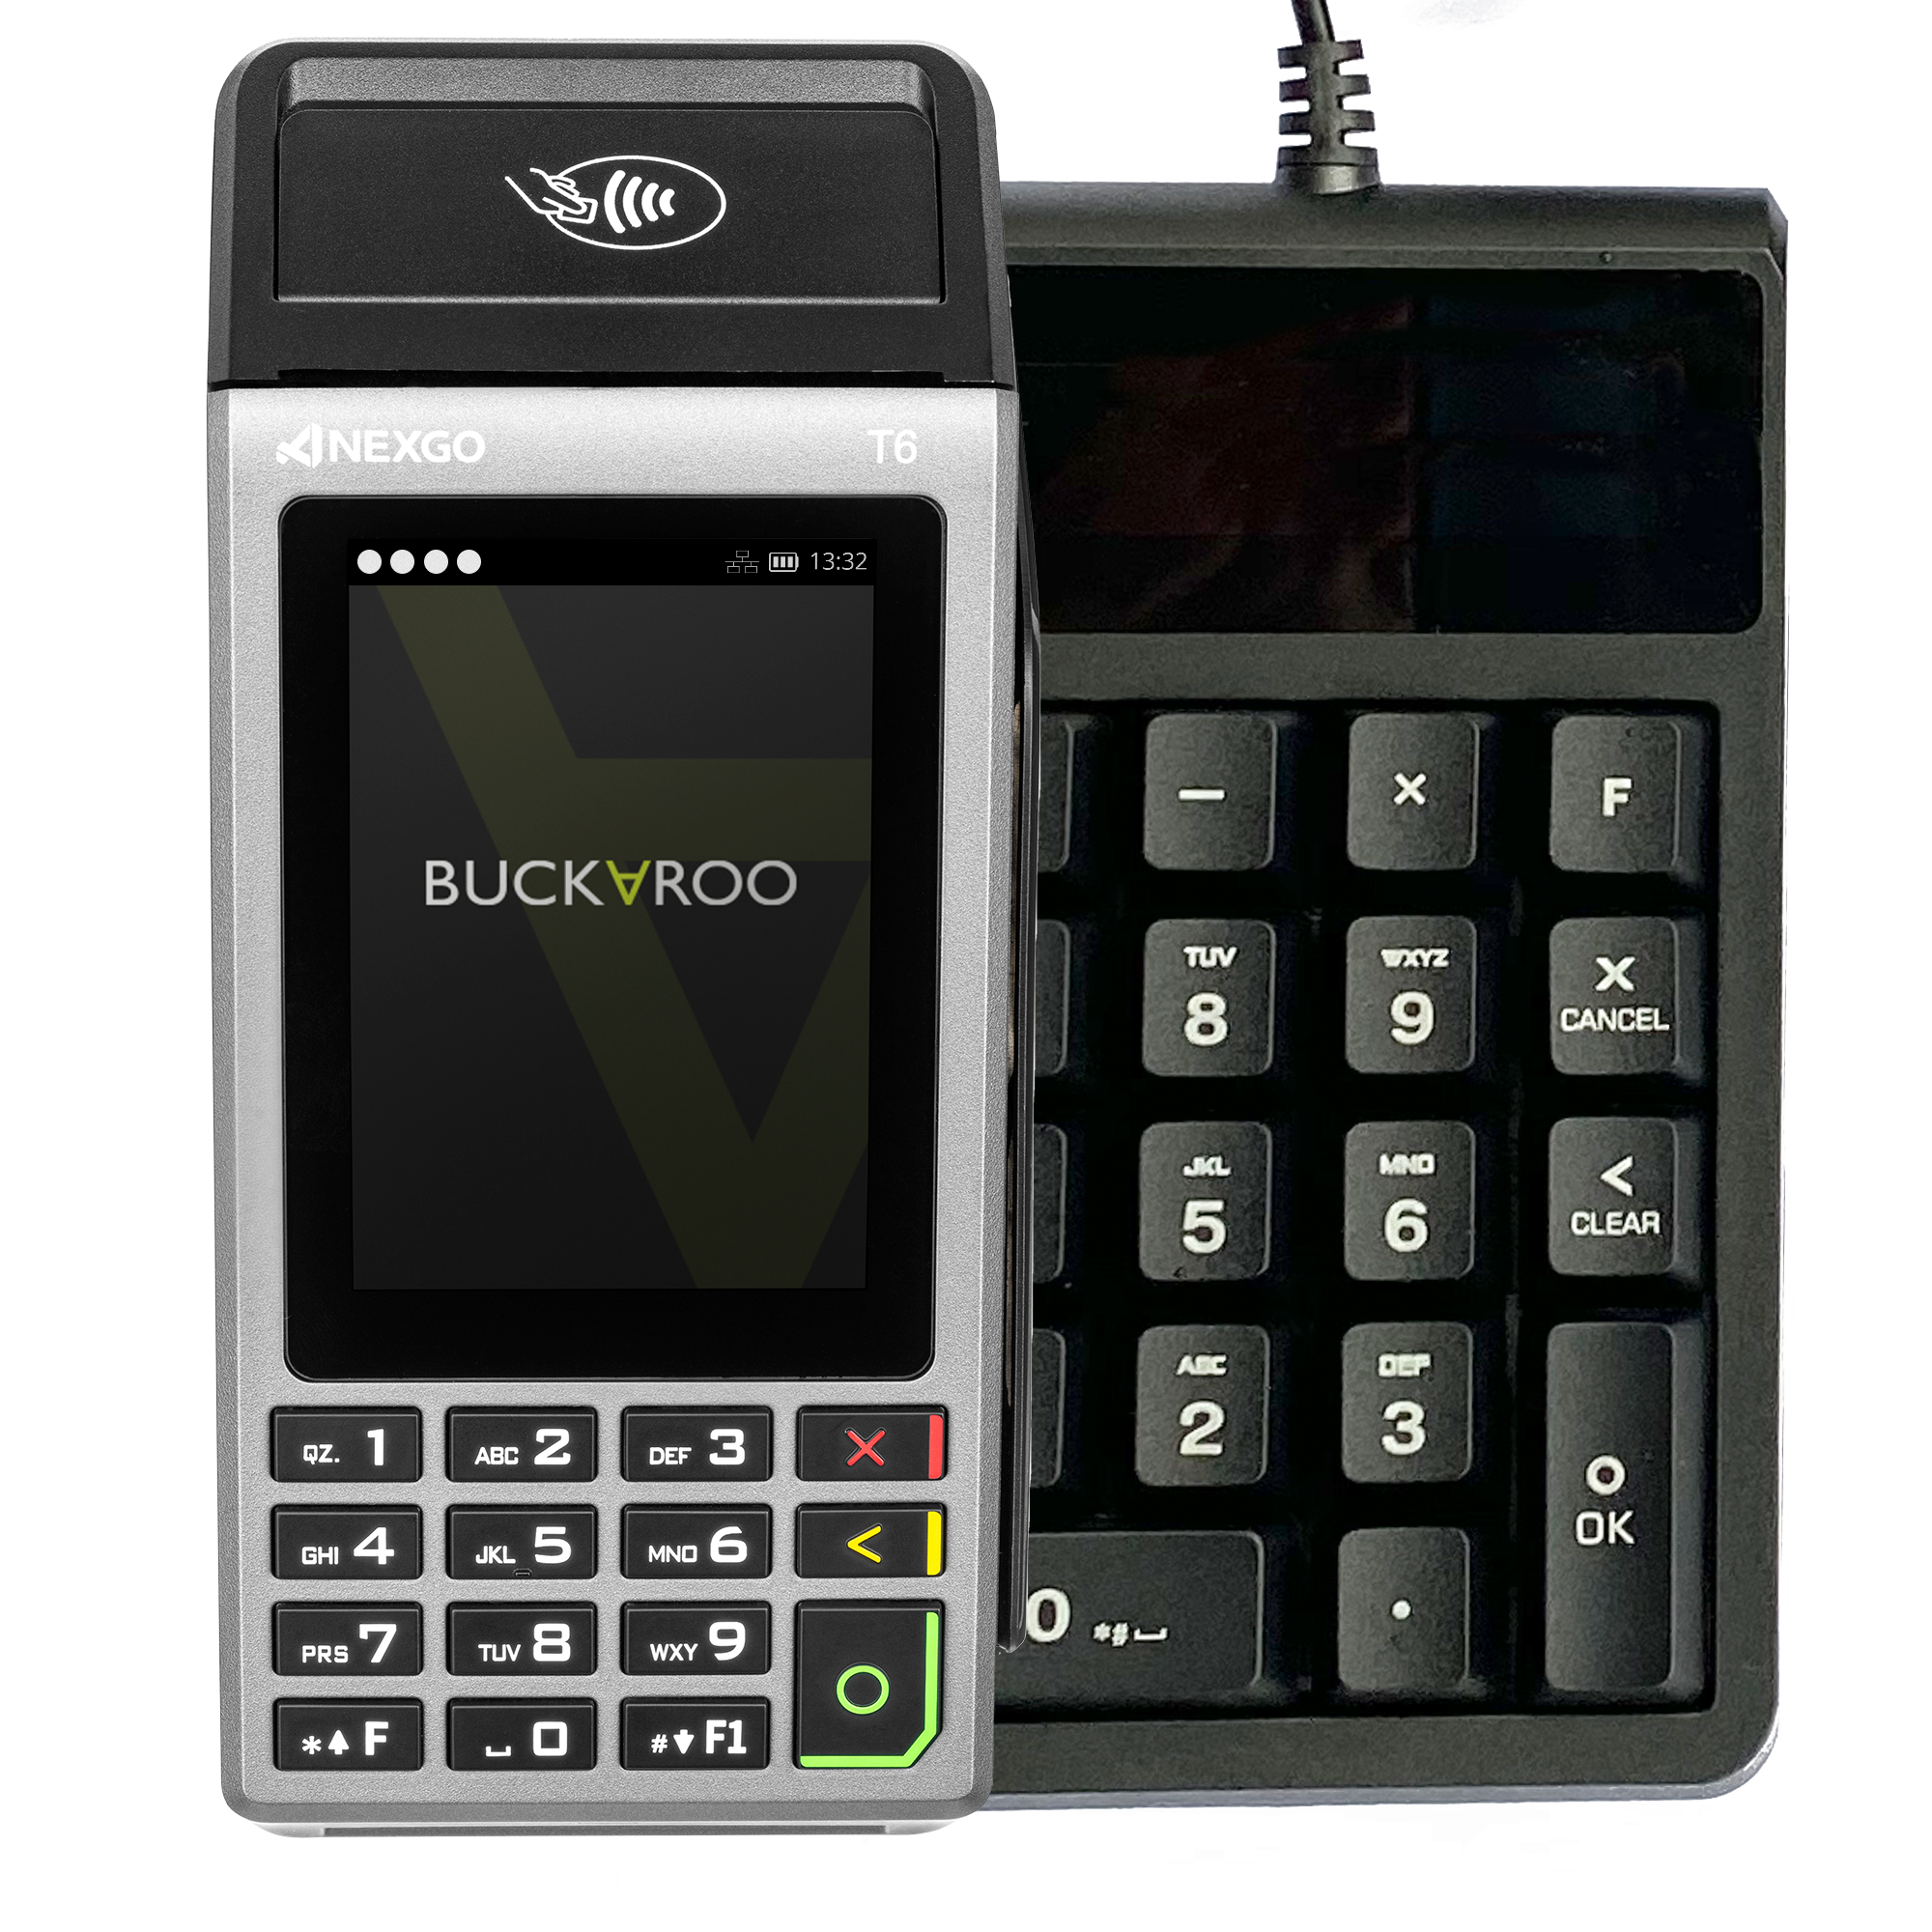
Connection
Connect the cashier unit to the PINPAD port.
Start Payment
- Enter the amount in euro cents on the cashier unit and press OK.
- The cashier unit now displays WAITING FOR CUSTOMER. Present the card to the payment terminal to make the payment.
- Once the payment is processed, the status will be displayed on the cashier unit. Press OK to return to the home screen.
Stopping the Payment Process
If you wish to stop the payment process, press the RED BUTTON on the payment terminal. This cannot be done from the cashier unit.
Starting the Payment Process Using a Payment Reference
- Enter the payment reference (up to 12 characters) and press OK (if no reference is required, you can press OK right away). For letters, press the number key several times in rapid succession.
- Enter the amount in euro cents on the cashier unit and press OK.
- Present the card to the payment terminal to make the payment.
- Once the payment is processed, the status will be displayed on the cashier unit. Press OK to return to the home screen.
Setting a Default Amount
There are situations where the same amount is processed (almost) every time. Using the restroom, parking at events or paying for admission, for example. It is possible to set a default amount on the payment terminal for these situations. This saves an operation each time entering the same amount (over and over).
To use this, you must first activate it within your personal page (My Buckaroo). After making this change, you need to perform an update on your payment terminal.
- On the main screen, select the F KEY (MENU). Then select SETTINGS.
- Scroll to the third option or select the DEFAULT AMOUNT option directly on the screen. You can now enter the amount. Please note: The amount is displayed in euro cents. When the (default) amount is entered correctly, confirm with the GREEN (ENTER) BUTTON.
Default Amount Processing
If a default amount is set, you can start a payment by pressing any numeric key on the main screen. The (default) amount entered is displayed and you can start processing the payment.
Processing a Different Amount
This option is only available when ALLOW DIFFERENT AMOUNT is enabled within “My Buckaroo”.
- On the main screen, select the F KEY (MENU).
- Select PAYMENT (VAR) to enter a different amount. Then follow the normal payment routine.
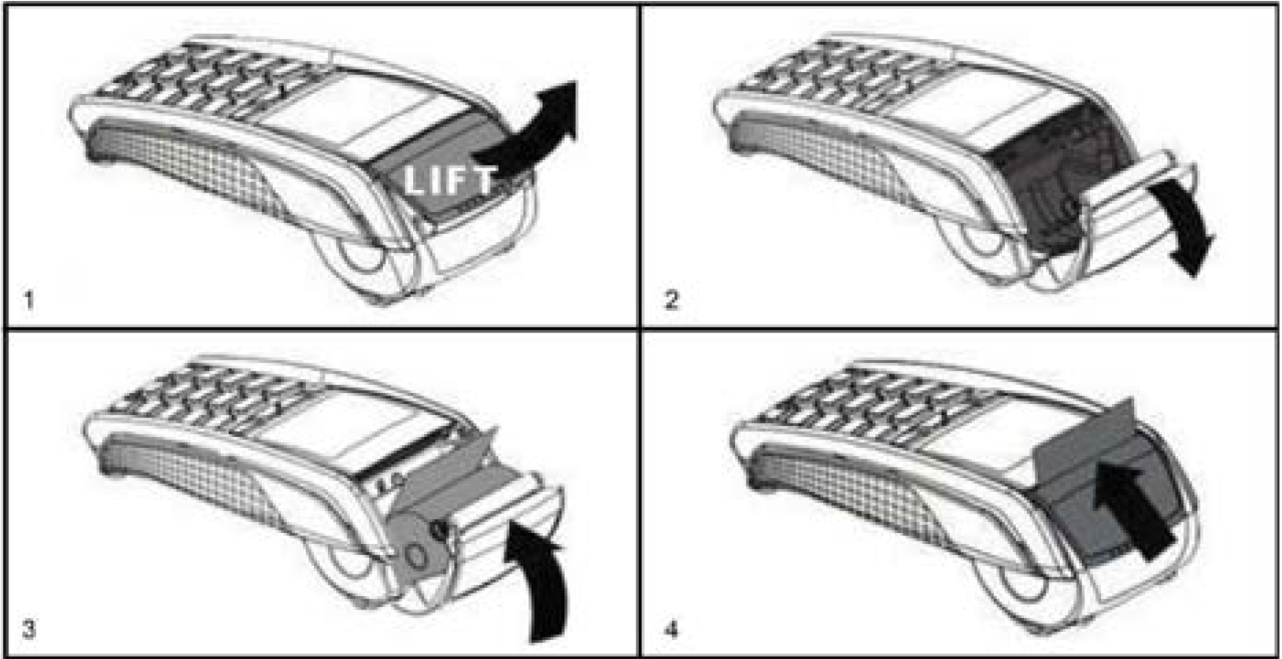
Replacing Paper
- Hold the terminal in one hand and release the printer cover with two fingers.
- Open the printer cover completely and remove the old receipt roll tube.
- Free the end on the new receipt roll and insert as shown.
- Holding the end of the paper clear, close the printer cover, pushing it gently until it clicks shut.
Note
- Buckaroo payment terminals only take paper rolls 57 mm wide and 40 mm in diameter. If you use a different size, it may damage your payment terminal.
- The correct paper rolls are available from Buckaroo's online store!
Updated over 1 year ago