Quick start guide

Overview
Buckaroo Shield rules are managed in the Configuration section under Shield > Rules. The rules are categorized as follows:
Merchant Rules
- Recommendation Rules: Five default rules recommended by Buckaroo. These can be edited or deactivated.
- Custom Rules: Rules created by the merchant.
Mandatory Rules
- Created and managed by Buckaroo. These apply to all merchants and cannot be changed.
Rule Details
Each rule displays the following information:
- Name: The name of the rule.
- Condition: The condition that triggers the rule.
- Active: Indicates if the rule is currently active.
Creating a Rule

To create a new rule:
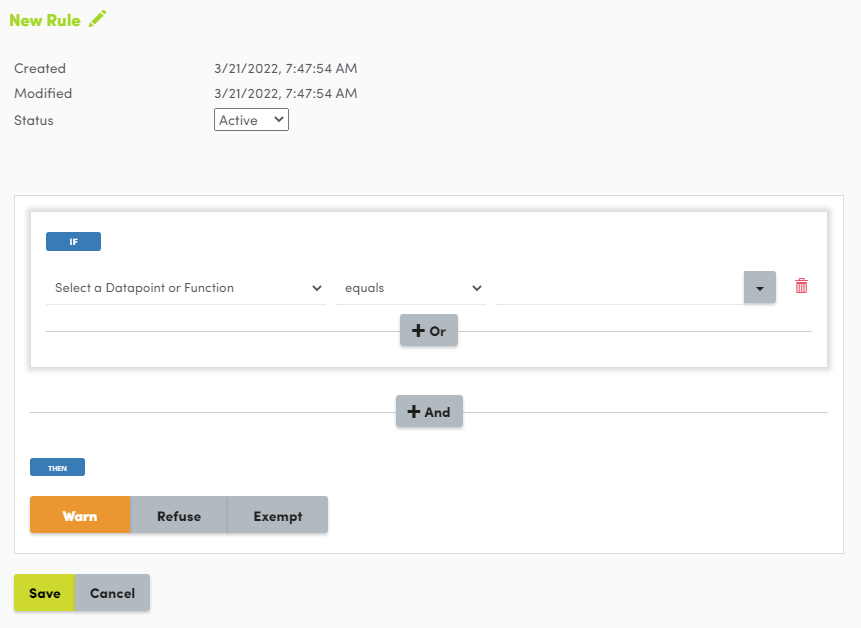
- Add Rule: Click the + Rule button to open the rule editor.
- Set Name: Click the pencil icon to name the rule.
- Specify Expressions: Create expressions using data points or functions, relational operators, and values.
- Use OR or AND operators for additional expressions.
- Some functions require additional parameters (e.g., time intervals for card numbers attempted from ClientIp).
- Choose Action:
- Warn: Issues a warning for the transaction.
- Refusal: Refuses the transaction or automatically refunds it in case of an after-the-fact refusal.
- Exempt: Exempts the transaction from Shield rules.
- Save Rule: Click Save to add the rule to the overview.
Managing Block and Trust Lists

Lists can be found under Configuration > Shield > Lists.
- Custom Lists: Managed by the merchant.
- Global Lists: Managed by Buckaroo and cannot be edited.
Each list displays:
- Name: Name of the list.
- Number of Entries: Number of entries in the list.
- Active Status: Whether the list is active.
- Specified Action: The action taken when a list condition is met.
Adding and Managing Entries
- Add Entry: Click the + button to add a new entry.
- Delete Entry: Option available for each entry.
- List Settings: Click the gear icon for options:
- Activate/Deactivate: Set the list to active or inactive.
- Auto-blocklist: Automatically add data from warned or refused transactions.
- Upload File: Upload multiple entries via a CSV file.
Block Data in Transaction Details

- Transaction Details: In the transaction details screen, the Shield tab displays data points that can be added to block lists.
- Add/Remove Data: Click the red icon to add or remove data from block lists.
Manage Email Notifications

- Email Settings: Found under Configuration > Shield > Miscellaneous.
- Notifications: Set email addresses to receive notifications based on actions (Warn, Refuse, Exempt).
- Multiple Addresses: Separate email addresses with commas.
- Email Content: Includes feedback on the transaction and the Shield action.
Push Notification Example
{
   "Action": "Indicates the action taken.",
   "Check": "Displays the name of the rule or list.",
   "Details": "Specifies the condition of the rule or list."
}
Fields Provided by Default:
- Action: Indicates the action taken.
- Check: Displays the name of the rule or list.
- Details: Specifies the condition of the rule or list.
Updated 11 months ago